
Top 10 Cable Hiders for Home and Office
Loose cords can make a tidy room feel unfinished. They collect dust behind desks, cross open floors, and catch on chair wheels. A well-chosen cable hider can make these everyday spaces look calmer while keeping cords more organized. The right option depends on the room, the number of cables, and how often you need access to them.
This guide compares ten cable hiders for home and office use. It considers practical details such as cable capacity, material, mounting method, length, and how neatly each design fits along a wall or desk. Some channels use adhesive backing for quick installation; others may need screws or a route that follows existing trim. Check the surface and measure the cable bundle before choosing. Small details matter.
No single option is perfect. A slim cover may suit one charging cable but feel cramped around several thick cords. A larger raceway can hold more, yet stand out in a narrow hallway. For a cleaner result, match the finish to nearby walls or furniture, and leave connectors accessible when you need them. Avoid forcing cables into a channel, and follow the product maker’s installation guidance. Keep damaged cords visible and replace them rather than concealing them. That part is easy to overlook.
The picks below are intended to help you compare styles and find a sensible fit. Consider how the space is used, not just how the product looks in a listing photo. A little measuring now can prevent an awkward installation later.
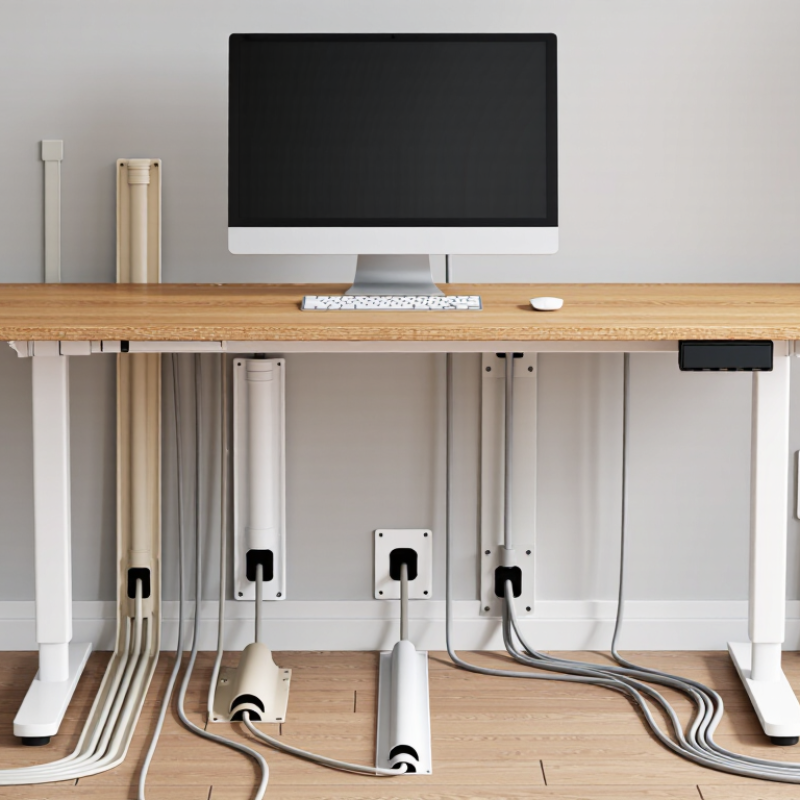
Understanding Cable Hiders and Their Role in Home and Office
Cable hiders route exposed cords along walls, desks, or floors, reducing visual clutter and accidental snags. They can make a room feel calmer, but they are not electrical protection. NFPA’s 2021 report, using 2015–2019 U.S. data, estimated that electrical distribution and lighting equipment was involved in about 32,620 home structure fires each year. That figure covers many equipment types; it does not mean cable hiders prevent fires. Keep cords undamaged, avoid overloading outlets, and follow the product’s installation instructions.
A low-profile raceway can suit a hallway, while a flexible sleeve may bundle cables behind a desk. Measure the route before buying. Check whether the cover can accommodate each cable without crushing it, and leave connectors accessible. I’ve seen neat-looking installations become frustrating when a power adapter no longer fits beneath the cover. Small detail. Also consider the surface: adhesive-backed channels may not hold well on dusty, textured walls.
Tips: Unplug devices before rerouting cords. Keep cables away from heaters and sharp furniture edges. Label both ends of frequently moved cables; it saves time later. Avoid hiding damaged cords inside a channel, even if the mess disappears.
Common Types of Cable Hiders and Their Key Features
Cable hiders differ in how much they cover and how easily they fit a room. Wall raceways are narrow channels that conceal several cables along a baseboard or desk edge. Many have snap-on lids, so adding or removing a wire is manageable. Measure the route and cable bundle first. A crowded channel can make the lid bulge.
Adhesive cable clips hold individual cords in place, such as a lamp wire running behind a side table. They are quick to install, but dust or textured paint can weaken the bond. Small detail. Clean and dry the surface, then test one clip before fitting a row.
Flexible sleeves gather several cords into a single wrap, useful beneath a computer desk. They reduce tangles, though they do not hide cables completely.
Under-desk trays attach to a desk or sit below it, keeping power bricks and extra wire off the floor. Check the tray’s dimensions and attachment method; a heavy adapter may need stronger support than light charging cords. Floor cable covers protect wires crossing a walkway, with sloped edges that are easier to step over. They can still shift on some floors, so placement matters. Not perfect.
The neatest option is not always the easiest to maintain. Leave enough room to identify each cable when equipment changes.
How to Choose a Cable Hider for Your Space and Needs
A cable hider should fit the room’s traffic, wall finish, and cable bundle—not just look tidy in a product photo. Measure the full route, including bends and plug clearance. Measure first. A slim adhesive channel may suit a desk against painted drywall, while a screw-mounted cover can be more dependable on textured surfaces. For cables crossing an open floor, choose a low-profile floor raceway with a non-slip shape, and keep it away from door swings and chair wheels. OSHA’s walking-working-surface guidance emphasizes keeping walking areas clear of hazards; secure loose runs rather than leaving them exposed.
Check the route. Count the cables and compare their combined thickness with the hider’s usable capacity, leaving room to add or remove a lead later. Grand View Research’s cable-management market report estimated the global market at about $23.9 billion in 2023. That figure signals broad demand, not that every cover suits every home. In a small office, a removable lid can make troubleshooting easier; in a child’s play area, a firmly fixed cover may matter more than quick access. Match the material to the setting, too: damp utility spaces need different consideration from a dry bedroom wall. I would still test adhesive on an inconspicuous patch first; paint and plaster do not always behave as expected.
Top 10 Cable Hiders for Home and Office
Cable clutter often gathers where daily routines cross: beside a desk, behind a television, or near a charging spot. The best cable hider depends on the surface, cable count, and how often you need access. Adhesive cable clips guide single cords along a desk edge. Flexible sleeves bundle several leads, while spiral wraps let you branch off individual cables. Fabric cable covers feel softer in shared rooms, though they can collect dust.
For longer runs, wall raceways conceal cords between outlets and equipment. Baseboard channels follow the room’s lower edge and draw less attention. Floor cord covers protect cables across walkways, but check that their edges sit flat. Under-desk cable trays lift power strips and slack from the floor. Small cord boxes hide adapters near a socket, while furniture-mounted hooks keep loose leads from slipping behind a cabinet.
A practical tenth option is a cable-management box with separate openings, useful when several chargers meet in one place. Measure the route before buying; a channel that is too narrow becomes frustrating quickly. I have also found that adhesive mounts may loosen on dusty or textured surfaces. Not perfect. Wipe the area first, and leave a little slack near plugs so furniture can move without pulling connections. For rented rooms, removable clips may be easier to reposition than fixed channels.
Top 10 Cable Hiders for Home and Office
The chart compares approximate DIY setup times, from adhesive clips and cable sleeves to wall raceways and under-desk trays. Actual installation time varies with cable quantity, surface condition, and whether measuring or drilling is needed.
Installation, Safety, and Maintenance Considerations
Before installing any of the ten cable hiders, measure the route and leave enough slack for plugs and equipment movement. Clean and dry the surface; dust can weaken adhesive and cause covers to lift. Check that the channel fits the cable type and quantity, and never force a bulky adapter inside. Small details matter. The NFPA report Home Electrical Fires, based on 2015–2019 data, estimates that electrical distribution or lighting equipment was involved in an average of 24,200 reported home fires each year. This does not mean cable hiders cause fires. It does show why damaged cords, overloaded outlets, and poor installation deserve attention.
Keep cords away from sharp furniture edges, hot surfaces, rugs, and door hinges. Do not pinch them beneath a cover or tightly bundle several power cords where heat cannot escape. Follow the hider maker’s instructions, especially around corners and floor transitions. For a rental or freshly painted wall, removable adhesive may seem convenient, but test a small area first; paint can still peel. Check covers periodically for lifting edges, cracks, discoloration, or trapped dust. Unplug equipment before inspecting its cable. If a cord feels hot, looks frayed, or has a loose plug, stop using it and replace it rather than hiding the problem. I might overlook a tiny gap during installation; it is worth checking again after furniture is moved.
Top 10 Cable Hiders for Home and Office — Installation, Safety, and Maintenance Considerations
| Rank | Cable Hider Type | Typical Use | Installation | Safety Considerations | Maintenance |
|---|---|---|---|---|---|
| 1 | Adhesive cable raceway | Routing a small number of low-voltage or power cords along a wall, desk, or cabinet. | Clean and dry the surface, measure and cut the channel, then apply the adhesive backing. Allow the adhesive to set as directed. | Check that the raceway is sized for the cables and that its cover closes without pinching them. Do not use it to conceal damaged cords. | Check periodically for lifting adhesive, loose covers, dust, or cables pressing against the channel. |
| 2 | Screw-mounted cable raceway | Longer or heavier cable runs where a more secure wall attachment is preferred. | Mark the route, check for hidden wiring or plumbing, and fasten the base with appropriate screws and anchors before fitting the cover. | Use suitable fixings for the wall material. Avoid drilling near electrical outlets or switches unless the area has been checked for concealed services. | Inspect fasteners and the cover after moving furniture or equipment; remove dust when the channel is opened. |
| 3 | Baseboard cable raceway | Concealing cables along the lower edge of a room while keeping them away from open floor space. | Fit the raceway along the baseboard using its approved adhesive or mounting hardware; use compatible corners and end pieces where needed. | Keep cables clear of sharp edges and doorways. Do not place cords where furniture or door movement can crush them. | Check corners and joints for gaps, and make sure vacuuming or floor cleaning has not loosened the raceway. |
| 4 | Floor cord cover | Protecting a cable that must cross a walkway in a home, studio, or office. | Lay the cover on a clean, flat surface and secure it as instructed. Select a cover with a channel large enough for the cord. | Use a product rated for the expected foot traffic and location. Keep the cover flat and visible; do not use an indoor cover outdoors or where vehicles pass unless it is specifically rated for that use. | Check for cracks, curling edges, shifting, and trapped debris. Replace a damaged cover promptly. |
| 5 | Under-desk cable tray | Organizing power strips, adapters, and cable slack beneath a desk. | Attach the tray to the desk underside with its specified clamps or mounting hardware, leaving room for plugs and airflow. | Do not exceed the tray’s load capacity. Keep power supplies ventilated, and avoid bundling cables tightly or overloading a power strip. | Unplug equipment before reorganizing cables; periodically remove dust and check mounts, plugs, and power-strip condition. |
| 6 | Flexible cable sleeve | Bundling several cables between a computer, monitor, or entertainment equipment. | Group compatible cables and wrap or thread them through the sleeve without forcing connectors through a narrow opening. | Leave enough slack for movement and avoid tight bends, especially near plugs. Keep heat-producing equipment and vents unobstructed. | Open the sleeve when adding or removing cables; check for abrasion, tight bends, or trapped heat. |
| 7 | Cable management box | Hiding excess cord length and small power accessories on a desk or floor. | Place the box on a stable surface, arrange cables through its openings, and close the lid without compressing cords. | Use only with equipment suitable for an enclosure. Do not cover ventilation openings, pack in heat-producing adapters, or overload a power strip. | Unplug before cleaning. Remove dust and check for warmth, discoloration, damaged cords, or loose connections. |
| 8 | Corner cable raceway | Routing cables neatly where two walls meet or where a wall meets the ceiling. | Measure the corner, cut the raceway to length, and secure it with the supplied adhesive or mounting hardware. | Choose a channel that does not force cables into a sharp bend. Check for hidden services before drilling. | Inspect joints and end caps for separation; wipe away dust and ensure the cover remains secure. |
| 9 | Cable clips and cord holders | Keeping individual charging, network, or peripheral cables in position at a desk or along a furniture edge. | Attach clips to a clean surface or secure them with the supplied fastener, then press each cable into its holder. | Use clips sized for the cable so they do not squeeze its insulation. Keep cords away from hot surfaces and moving parts. | Check that clips remain firmly attached and that cables show no cuts, flattening, or fraying. |
| 10 | Desk grommet with cable insert | Passing desk cables through an existing tabletop opening to reduce loose cords on the work surface. | Fit a grommet that matches the opening; feed cables through the insert without pulling connectors or cords tightly. | Use an existing opening or have a suitable opening made with care. Smooth or protect exposed edges, and keep cords free from pinching. | Remove dust from the grommet and check its edges and insert for wear that could abrade cable insulation. |
Related Posts
-
10 Cable Hider Tips for a Neater Workspace?
-
7 Cable Hider Tips for a Clean Organized Workspace
-

2026 Best Cable Ducting Solutions for Your Home and Office?
-
Top 10 Cable Hider Solutions for a Clutter Free Home?
-
2026 Top Cable Cover Options for Your Home and Office Needs?
-
10 Essential Tips for Choosing the Best Cable Hider for Your Home