
7 Cable Hider Tips for a Clean Organized Workspace
A clean workspace is not created by hiding every wire blindly. It comes from understanding where cables travel, how often devices move, and which connections need quick access. A reliable cable hider can guide power cords beneath a desk, protect charging leads from sharp edges, and reduce the tangled bundle near your monitor. It should make the workspace calmer without turning maintenance into a frustrating puzzle.
Cable-management specialist David Greenfield says, “The best cable system is the one people can understand and maintain.” That principle matters when choosing a cable hider. A narrow sleeve may suit a laptop charger, while a rigid raceway works better for several cables running along a wall. Measure first. Leave breathing room. Do not force every wire into one channel.
These seven tips focus on practical improvements you can see and feel. Expect fewer cables brushing your knees, cleaner desk photos, and easier access behind your equipment. Small details matter, such as labeling both ends of a cable or leaving extra length near a standing desk. That extra loop may look imperfect. It can prevent strain later.
Not every solution will fit every workspace. Adhesive clips can loosen on dusty surfaces, and an oversized cable hider may look more noticeable than the cables themselves. Test one section before changing the entire setup. A tidy workspace should support real habits, not demand unrealistic perfection.
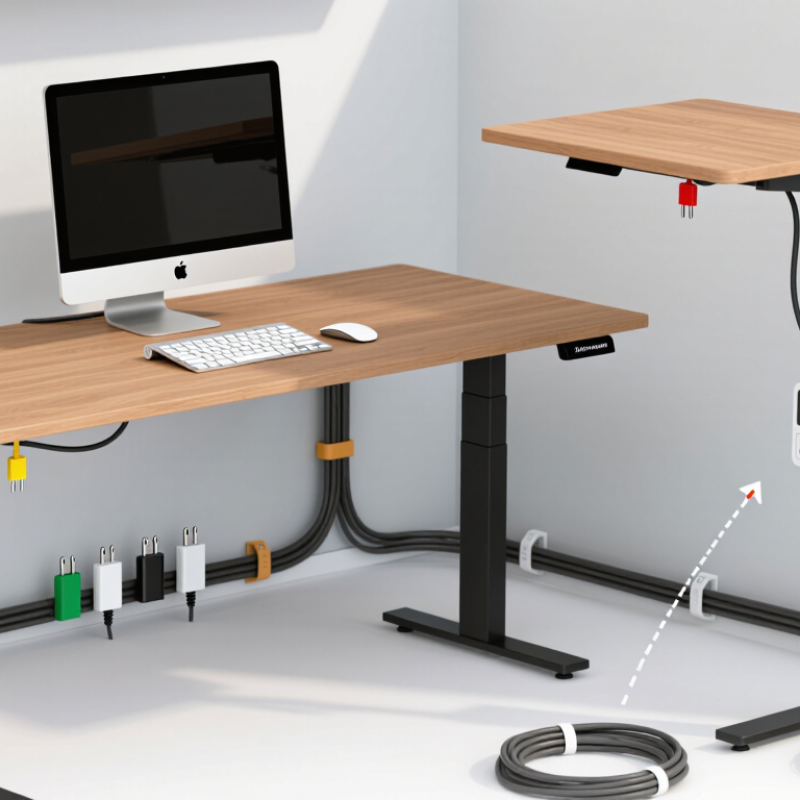
Assess Your Workspace and Identify Visible Cable Clutter
Before choosing a cable hider, inspect the workspace as it is actually used. Sit at the desk and photograph the area from eye level. Check behind the monitor, beneath the tabletop, and beside the power outlet. Look for cords crossing walking paths, looping around chair legs, or hanging below the desk edge. Small tangles are easy to dismiss. They often become daily friction.
Gensler Research Institute’s 2023 Global Workplace Survey found that only 43% of employees considered their workplace effective for both individual and group work. A visually chaotic desk may not cause that problem alone, but it can weaken focus and make limited space feel smaller. Mark each cable’s purpose, endpoint, and movement range before hiding anything. Power, display, network, and charging cables may need different routes. OSHA’s Computer Workstations guidance also identifies loose cords across walkways as trip hazards. Keep those routes clear first.
I once bundled every cable together. It looked neat, but unplugging one device became awkward. That was a poor fix. Leave gentle slack near ports, especially for adjustable screens and frequently moved laptops. Use colored labels or a simple hand-drawn map. If a cable remains unused for several days, question whether it belongs on the desk at all. The assessment is imperfect, but it reveals clutter that a quick visual tidy can miss.
Choose Cable Hiders That Match Your Desk and Equipment
7 Cable Hider Tips for a Clean Organized Workspace
Choose cable hiders that match your desk and equipment, not only your preferred color. A white adhesive channel can disappear against a pale laminate surface. A black fabric sleeve may suit dark metal legs and exposed monitors. Measure the cable bundle first. Leave room for plugs, adapters, and future devices. Tight channels often look neat today and become frustrating tomorrow.
The U.S. Bureau of Labor Statistics recorded 865 fatal workplace injuries involving falls, slips, and trips in 2022. Cable control cannot remove every risk, but it can reduce loose-wire hazards around feet and chair wheels. OSHA guidance also recommends securing cords and keeping walkways clear. Route power cables separately from sensitive data lines when practical. Choose flexible sleeves for moving equipment, and rigid raceways for fixed desk edges. Check heat buildup around power adapters. This detail is easy to miss.
Material matters. Silicone channels bend around curved desk frames, while adhesive raceways suit smooth, clean surfaces. For textured wood or dusty areas, clips with screws may hold better. Test one small section first. Some adhesive fails. I have learned that “universal” cable hiders rarely fit every setup well. Match the hider’s capacity, mounting method, and access points to the equipment you actually use. Leave a gentle loop near each device, so cleaning or repairs do not pull the connector.
Plan Cable Routes Before Attaching Any Cable Management Tools
7 Cable Hider Tips for a Clean, Organized Workspace
Plan every cable route before attaching clips, sleeves, or channels. The U.S. Bureau of Labor Statistics reported that 26.5% of employed people worked from home on an average day in 2023. Home workstations now carry more equipment, often in smaller spaces. I begin by sketching the desk, outlets, monitor arms, and walking paths. This simple map exposes awkward crossings early.
Keep power cables separate from data lines where practical. Route each cable along the shortest safe path, but leave gentle slack near devices. Measure twice. A cable pulled tightly can stress its connector when the desk moves. Mark both ends with removable labels. Then test the setup with the desk raised, lowered, and turned. This step feels slow. It prevents rework.
HSE’s 2023/24 workplace safety report continues to identify slips and trips as a major source of non-fatal injuries. Keep cables away from feet, chair wheels, heat sources, and sharp desk edges. Use one route behind the desk and another beneath it only when necessary. Avoid hiding a messy bundle before checking airflow and access. I once placed a power strip too far from the outlet, creating tension that was invisible from above. The layout looked clean, but it was poorly planned. Leave room for one future device, not five. A realistic route stays useful longer.
Secure, Label, and Separate Cables for Easy Maintenance
Secure, label, and separate every cable before hiding it. Loose wires slide behind desks, collect dust, and become difficult to trace. Use low-pressure clips or cable sleeves that hold cords without crushing them. Leave a small service loop near each device. It gives you room to move equipment without pulling connectors. Keep power cables apart from data cables where practical. This reduces tangling and makes faults easier to inspect.
Label both ends with the device name and destination. Short labels work best: “Monitor—Dock” is clearer than “Cable 4.” Follow the administration principles in TIA-606-C, which emphasize consistent identification for telecommunications cabling. Group cables by function, not appearance. Power, display, network, and charging lines should have separate paths. Use different colors only as a quick visual aid. Labels remain essential.
Security matters, too. Anchor cables near walkways and prevent strain at plugs. Verizon’s 2024 Data Breach Investigations Report found human involvement in 68% of breaches, although cable clutter does not cause every security incident. In technical areas, clear identification can still reduce rushed mistakes.
Uptime Institute’s 2024 Annual Outage Analysis reported that 54% of serious outages cost more than $100,000. That figure does not prove poor cable management caused them, but it supports careful maintenance. My own weak point is the spare-adapter box. I label active cables well, yet forgotten adapters still appear there. A monthly check helps, though I sometimes postpone it.
Review the Setup and Adjust It for Long-Term Organization
A tidy cable setup is not a one-time project. I learned this after my first arrangement looked perfect for only two weeks. New devices appeared, charging positions changed, and several cables began crossing the desk again. Long-term organization requires regular review and small adjustments.
Check the setup every month. Remove cables you no longer use. Group charging, display, and power cables separately. Use short sleeves or clips to guide each group along the desk edge. Leave gentle slack near connectors, so daily movement does not pull against the ports. Label both ends of unfamiliar cables. It saves time later.
Look behind the desk with a flashlight. Dust, tight bends, and tangled adapters are easy to miss. Inspect insulation for cuts or flattening, and replace damaged cables promptly. Keep power connections ventilated and avoid crowding one outlet. My own system still has one awkward cable near the monitor. I have not solved it perfectly. That is useful feedback, not failure. A workable setup should support real habits, not just look clean during a photograph. Recheck it after moving furniture, adding equipment, or changing your work routine.
Related Posts
-
10 Cable Hider Tips for a Neater Workspace?
-
Top 10 Cable Hider Solutions for a Clutter Free Home?
-
2026 Top Cable Cover Options for Your Home and Office Needs?
-
Discover the Best Cable Hider Solutions for Your Needs?
-
2026 Best Cable Ducting Solutions for Your Home and Office?
-
10 Essential Tips for Choosing the Best Cable Hider for Your Home